The UI is always displayed as a 2D screen at the forefront of the game window, providing information and receiving interaction from the player.
In this article, we will introduce some related concepts, how to use the UI editor and how to script the logic of the UI.
Introduction to concepts
UI files
The UI file stores information about the customized UI, and the corresponding UI entity will be created based on the UI file when the game is run.

UI files can be created out of assets and edited. Within a single UI file, you can add multiple UI widgets, which provide various functions such as text display, image display, and receiving input.
Multiple custom UI entities can be created from a single UI file. For example, if each player creates a button from the same UI file, or plural buttons are created multiple times on a player’s interface using that UI file, the UI entities to which those buttons belong are all different entities created from the same UI file.
Customizing UI entities
When the game is run, a corresponding custom UI entity, hereafter referred to as UI entity, is created based on the UI file.
The UI entity itself can mount scripts and has properties, and there are several widgets under the UI entity, which can be retrieved by the UI entity.

Create UI entity
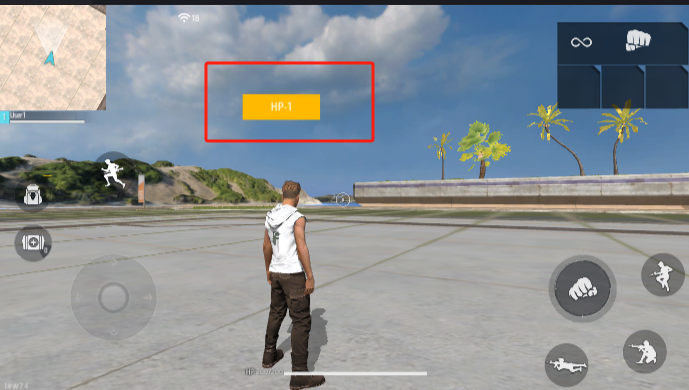
UI entity created on this player with only one button widget.
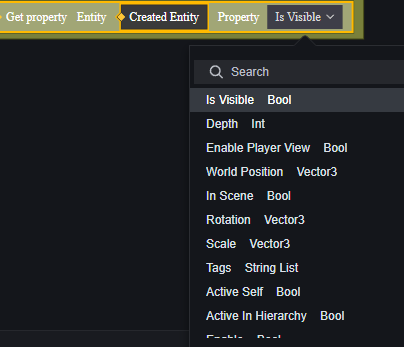
Some of the properties of the UI entity

Widgets of the UI entity
The UI filename is the custom UI entity ID. custom UI entity ID is an index, and an index is a different concept from an entity.
Widgets
Widgets are the basic building blocks of the UI and are the components that actually generate functionality. In the UI file, you can select the widgets to use and configure the properties of each control.

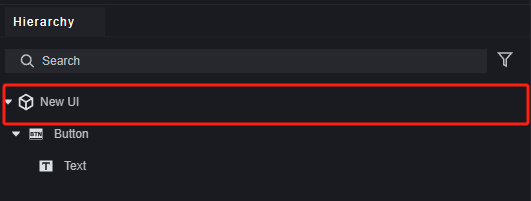
Any UI file has a root node.UI controls are parented to the root node or to other UI widgets. This root node corresponds to the UI entity created by the UI file and serves only a structural purpose, providing no actual control functionality.
In the script, you can get all its widgets and read/write their properties from a certain custom UI entity.

The UI in this script node is the interface entity created from the UI file, but multiple entities can be created from a single UI file, and you need to specify which controls on which interface entity for which player.
Panels
Panels are containers for widgets.
The panel itself has a certain visual representation and provides a role in displaying the depth, and the widgets under the same panel are affected by the panel hierarchy.
In addition to the basic panels, we provide scrolling panels for scrolling through multiple controls when placed in a fixed area.

Built-in UI
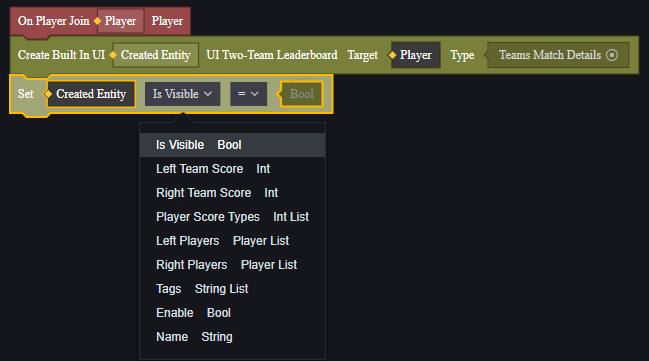
Built-in UI is the official UI content that has already been created, some of which are loaded by default, such as the movement rocker and jump button; some of which are not loaded by default, such as the countdown timer and compass.
Built-in UI can’t modify widgets in it, but you can dynamically modify the properties of built-in UI entities open for editing.
UI Depths
The concept of UI depth is introduced when different interfaces overlap.
The UI depth determines the drawing order of this custom UI, and conflicts with other rendering depths may cause the rendering order to be interspersed. The rendering order of widgets within a custom UI is automatically set based on this property. It is recommended to leave a reasonable interval between rendering depths for custom UIs that may overlap.
Attempting to manipulate an overlapping area will always attempt to manipulate the topmost widget displayed.
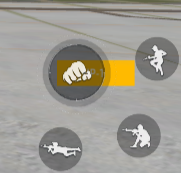
Clicking on the part of the attack that overlaps with the custom button at this point will only perform the attack. Clicking on the part of the custom button that does not overlap with the attack will trigger the custom button.
The customization UI depth consists of the UIRoot depth, the panel depth, and the widget depth.
Among them:
UIRoot depth has the most influence, UI entities created by different UI files are sorted according to the UIRoot depth, the larger the UIRoot depth the more the created UI entities are displayed above overall.
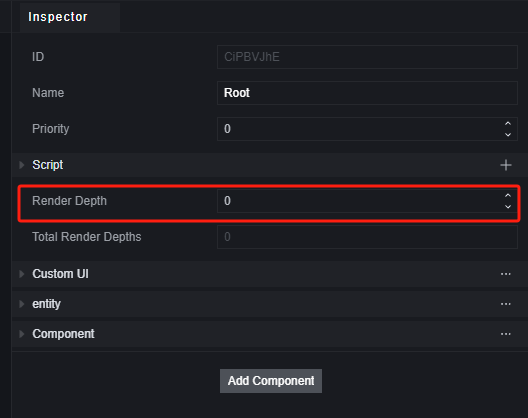
When UIRoot depth is the same, there may be inconsistency in operation detection and display, do not set two overlapping UIs to the same depth.

The UIRoot level of the customized button is -1, which is less than the 0 depth of the attack button in the default UI.
The Root level of the built-in UI is all 0. If you need to place it below the built-in UI, you need to set the depth to a negative number.
Panel depth has a secondary effect, it affects the order of display within the same UI file. Panel depth adheres to the following rules:
- panels and controls within panels are always displayed above widgets under the same depth.
- the order between panels of the same level is determined by the order under the Hierachy menu, the further down the depth the more they are displayed above.
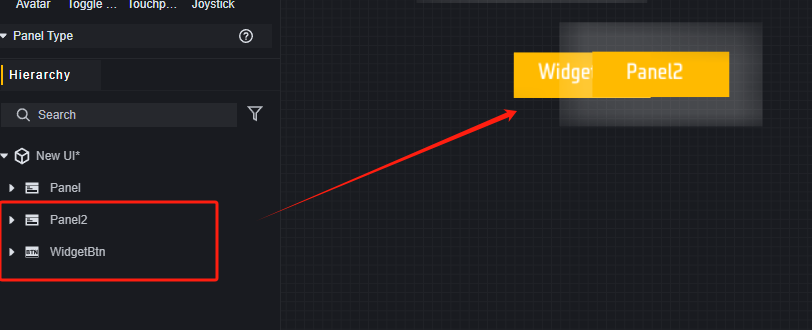
Widgets ordered under Panel2 are also obscured by Panel2.
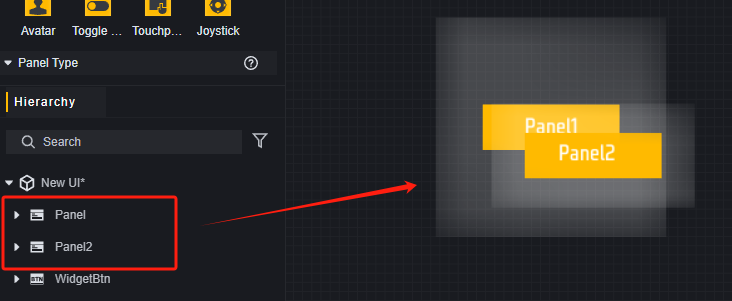
Two panels at the same depth, the one below obscures the one above.
The panel depth is hidden and cannot be set directly, you can only adjust the display order of the panels by modifying the hierarchy menu.
Widgets Depths
For controls under the same UIRoot, the same panel, their depth is determined by the order under the Hierachy menu, the further down the hierarchy the higher.
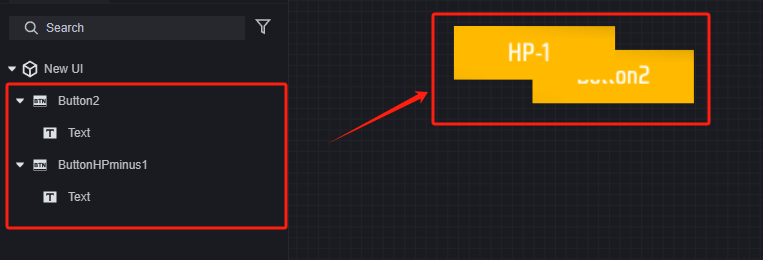
The control depth is also hidden and cannot be set directly, you can only adjust the display order of the controls by modifying the Hierachy menu.
Editing UI files
Introducing the UI editor
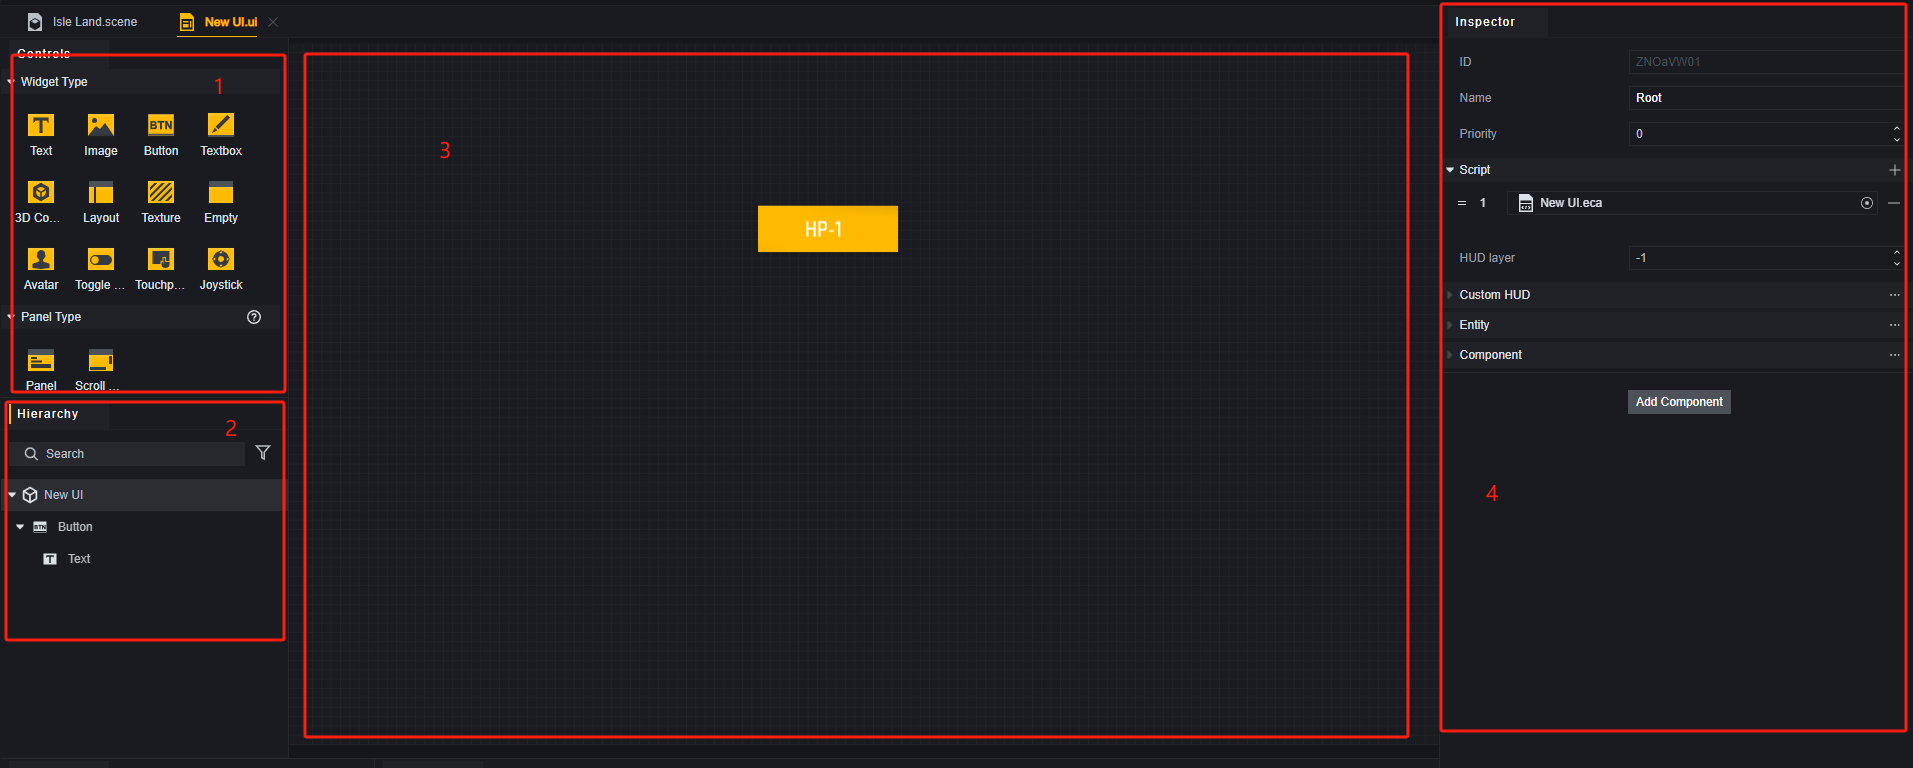
- Widgets/Panels: Here are the templates for all the widgets and panels.
- Hierarchy Menu: In the depth menu, you can view the widgets in this UI file. And you can confirm the depth of the widgets inside the UI file, the further down the control is displayed at the top.
- Canvas: In the canvas, you can adjust the position and size of the widgets to achieve the desired effect.
- Properties menu: You can edit the properties of widgets in the properties menu.
Usage Examples
Dragging a widget from the control selection panel to the canvas creates a widget at the corresponding position. By default, a widget dragged to the canvas is parented to the root node.
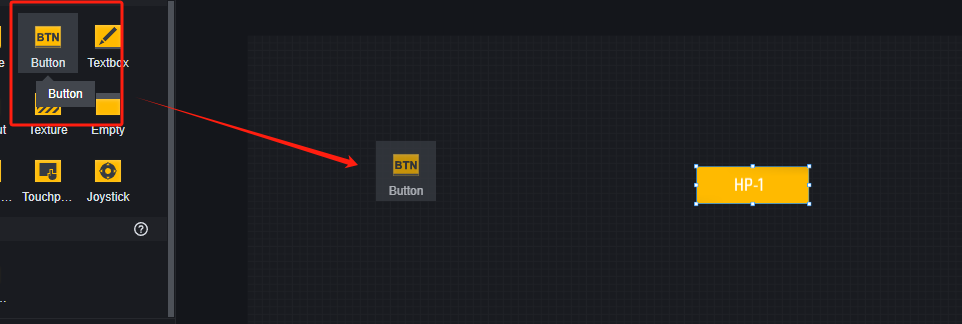
Dragging a control from the control selection panel to any control or root node in the depth menu creates a child control with that control or root node as the parent. The creation position is the same as the parent, but in the center of the canvas when the root node is the parent.
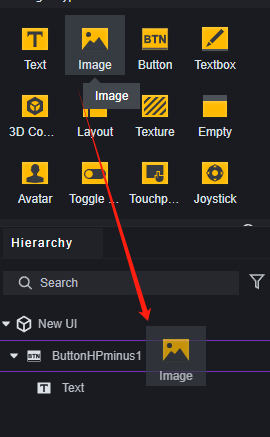

Since the newly added image is at the highest depth in this UI, it overrides the previous button.
Modify the properties of the selected widget in the Properties panel. Each control has generic properties and properties that are specific and related to the type of the widget.
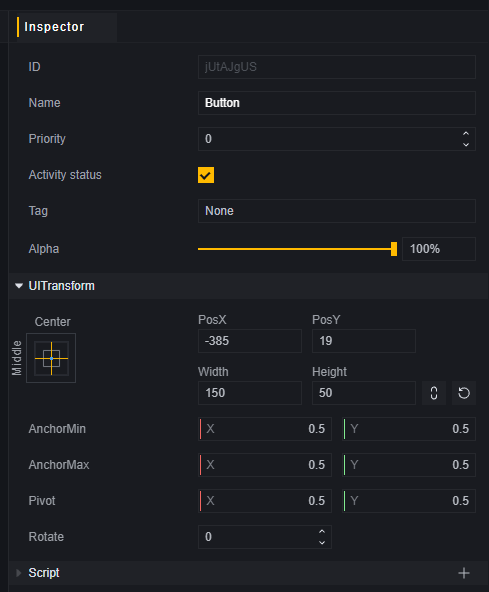
Generic properties
UI controls will resize and reposition themselves according to the anchor parameters and the parent UI size, and for UI controls without a parent, they will adapt to the aspect ratio of the user’s device to achieve an adaptive resolution effect
In most simple cases, you can just use the anchor preset without having to manually modify the anchor parameters.

Modify the UITransform property of the text widget and it will be offset relative to its parent: the custom button.
For each class of control, it also has properties specific to that class of widget.
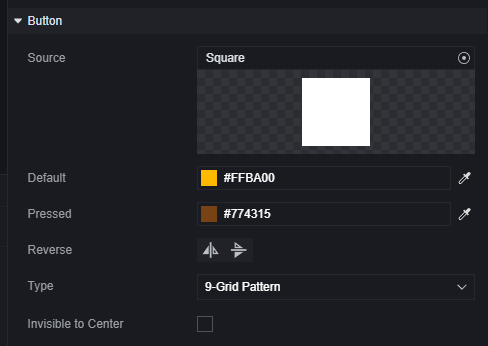
Unique properties of a button.
UI logic
Creating the UI
The UI for the corresponding runtime platform can only be created through the API on the script.
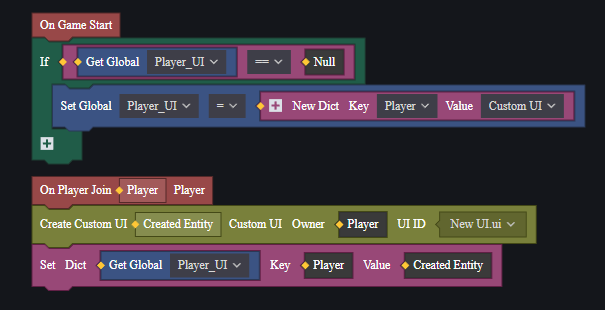
Take the block script as an example:

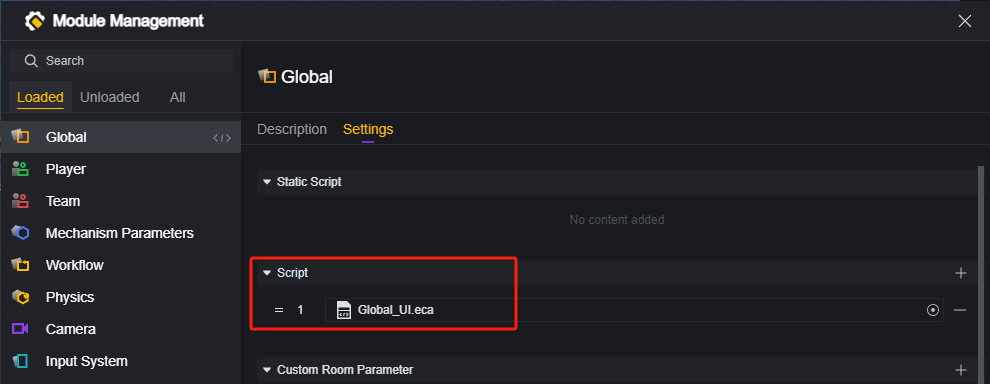
It is recommended to add scripts dedicated to managing UIs to the Global module.
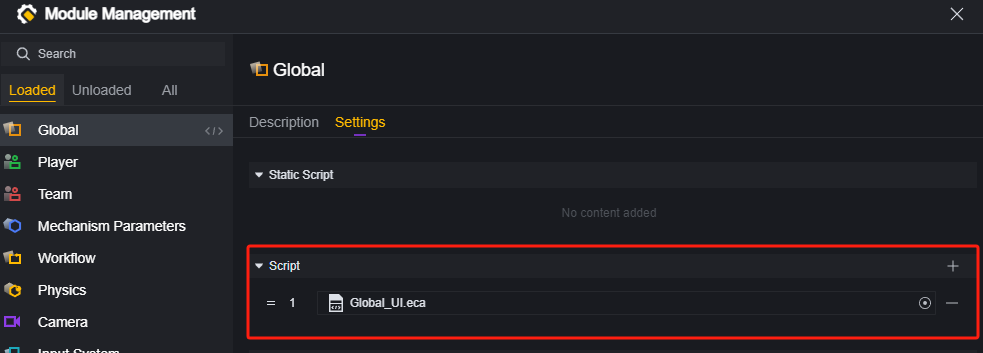
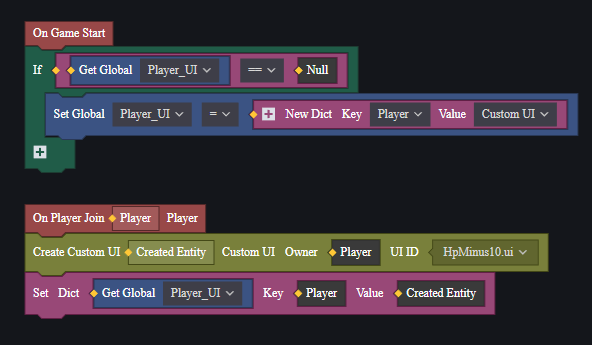
When creating a UI using the server API, you need to specify the player. Then it is very convenient to use a dictionary to manage the UI on the player:
Destroy UI
When you need to destroy the UI on the corresponding player, use a dictionary to quickly fetch the UI entity:

Widget Logic
Players can input via buttons, joysticks, toggles, etc. Using the appropriate events the player’s input can be fetched and the designed logic can be executed.
Suppose we have such a button and a text that each click will add 1 to the number on the text.
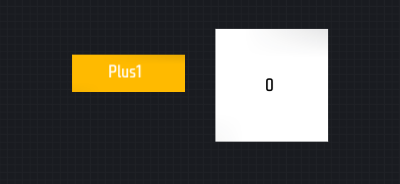
When that button is pressed, the text on another text control needs to be changed, so you need to fetch the text widget of that UI entity. Using the dictionary, the UI entity is stored in a global variable when the UI is created:
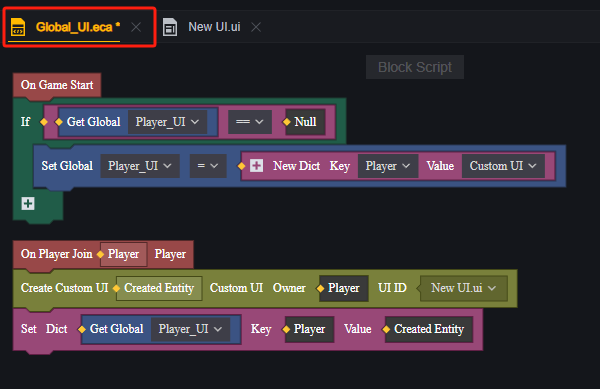
This is the script used to create the UI in the global module
Add a script for the button:

Get the text widget from the UI entity stored in the global variable:

Set the value displayed by this widget plus 1 when the button is pressed:

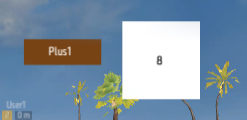
The button was pressed eight times.
Callbacks
In the example above, it is easy to see that modifying the text is not complicated, but fetching the entity where the text widget is located is more tedious.
Using callbacks, you can avoid this tedious operation and quickly realize the interaction between different widgets under the same UI entity.
In fact, in most cases it is faster to use callbacks.
In the same example, create a script for the UI entity:

Create a callback function for a button whose logic is to add 1 to the number displayed in the text widget each time it is called:

The UI callback functions have special nodes located under the event category.
Add callbacks to buttons:
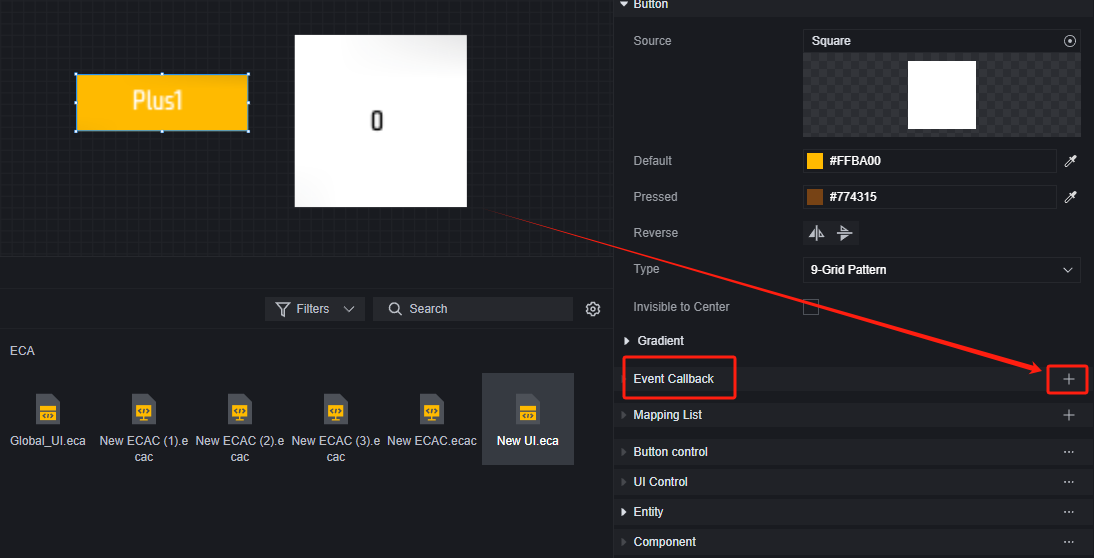
Select the callback function you just created:

And that’s it:

Button pressed six times
Because the callback function is on the UI entity, it is much easier to get to the controls under the UI entity than it is on the widgets. It is also easier to maintain when the number of widgets and logic in the UI entity is large.
Client UI
Similar to the script itself, the UI distinguishes between server and client. The server UI is created by the server API and uses the server API and events internally. The client UI is the same. The UI created by the server script is the server UI, and the UI created by the client script is the client UI, because we have set platform restrictions on the blocks that can be used within the meta-script.


Rich Text
The UI text widget supports rich text, which gives you more freedom to format text using rich text syntax. With rich text, you can specify multiple formatting expressions in the same piece of text, without having to use multiple text widgets to put together the desired paragraph.
| Rich Text Format | Rich Text Format | Examples | Example Effects |
|---|---|---|---|
| Bold | [b][/b] | text [b]text[/b] |
 |
| Italic | [i][/i] | text [i]text[/i] |
 |
| Underline | [u][/u] | text [u]text[/u] |
 |
| Strikethrough | [s][/s] | text [s]text[/s] |
 |
| Color | [color code][-] | text [FF0000FF]text[-] |
 |
| Superscript | [sup][/sup] | text text[sup]textsup[/sup] |
 |
| Subscript | [sub][/sub] | text text[sub]textsub[/sub] |
 |
Rich text supports overlay usage. For example, if you want the text to be both bold and italic, you can write it as [b][i]text[/i][/b].
Color code
When specifying the color of text in rich text, the color code can have the following formats:
- Hexadecimal RGBA format: 8 characters in length, with each two characters representing a channel, and the decimal values 0-255 represented by hexadecimal numbers. For example, [FF0000FF], which represents a completely opaque red with the maximum value for the red channel and 0 for the green and blue channels.
- Hex RGB format: similar to RGBA, but with a length of 6 characters, each pair of characters representing a color channel, with the transparency being the default FF (decimal 255) maximum value. For example [00FF00], which represents the maximum value for the green channel, with the red and blue channels being 0, for completely opaque green.
- INT32 format: value range [–2147483648, 2147483647], representing a color that has been converted from the RGBA format according to the rules.
Example
The following assumes a simple custom UI requirement and demonstrates how to create a functional custom UI and destroy it.
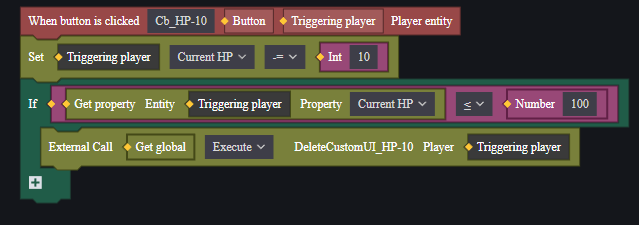
Hypothetical requirement: create a button in the center of each player’s screen that causes -10 HP per click, and destroys the button when HP is less than or equal to 100 after clicking the button.
Create UI file
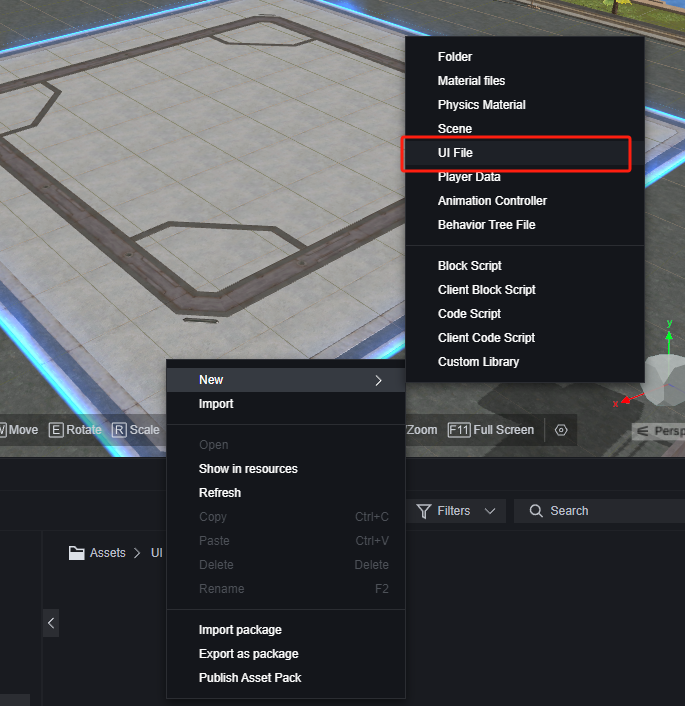
Create a new UI file and open it for editing
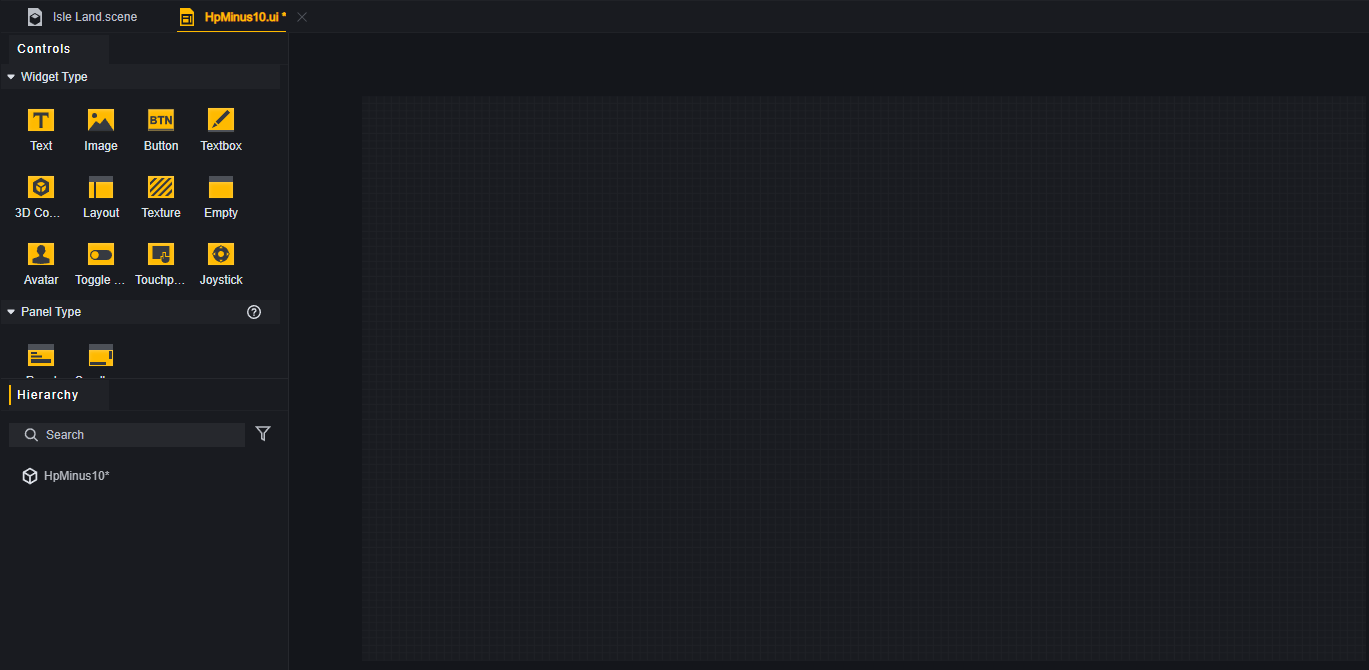
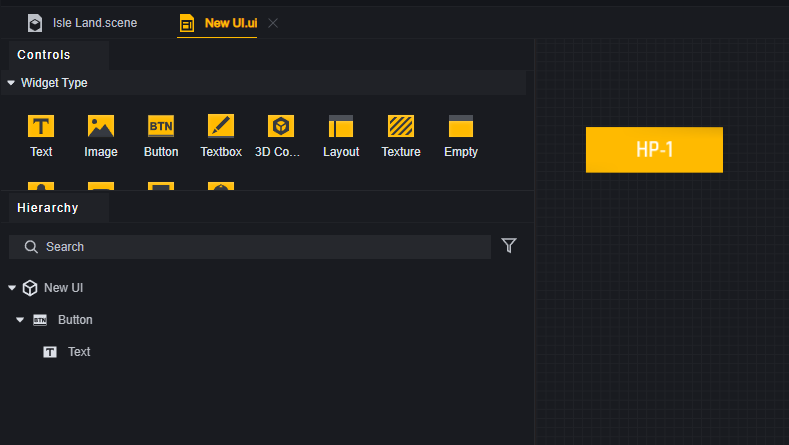
The canvas corresponds to the player’s screen and creates a button at the top center. Also, add a text control as a child widget for the button with the purpose of explaining the button’s function to the player.
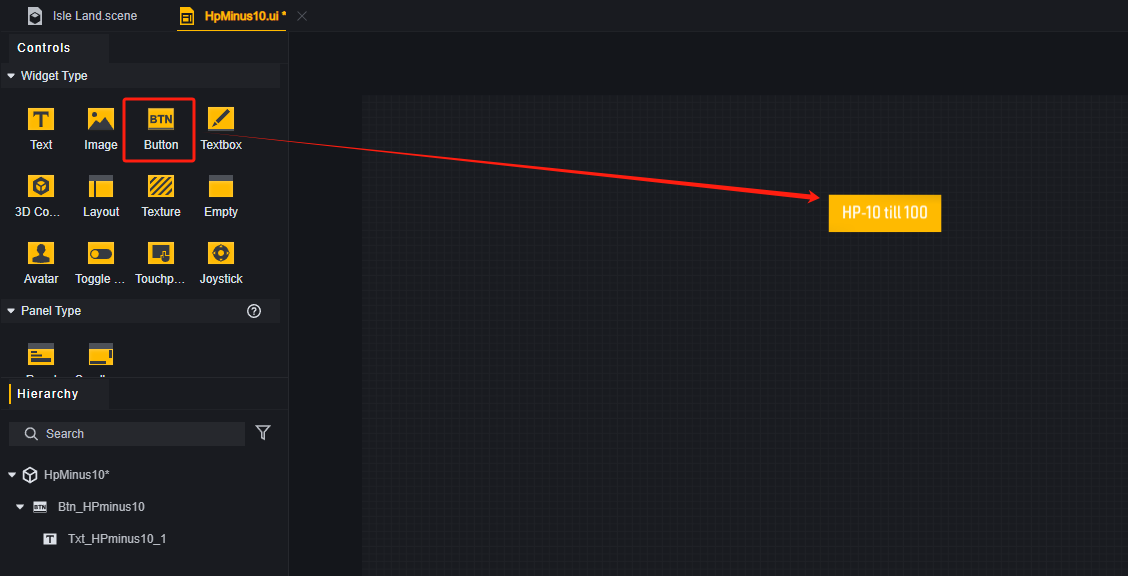
For ease of management, the name of the widget can be changed in the depth menu.
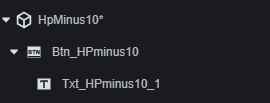
Create UI
Create a script in the global module that will be used to manage the UI.
Create this UI file for each player when they join.

You can also choose other points in time for creation, such as at the start of the game, at the start of the phase.
Create a dictionary to manage the blood reduction buttons for each player
Go to debugging to check button creation:
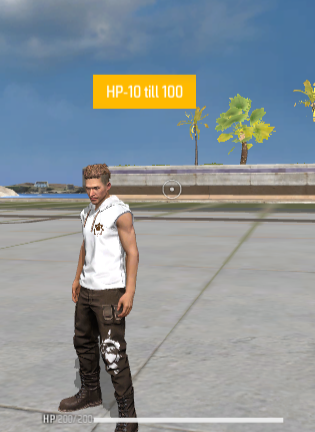
Button Logic
We decided to use a callback to handle reducing player blood by mounting a script for the root node.
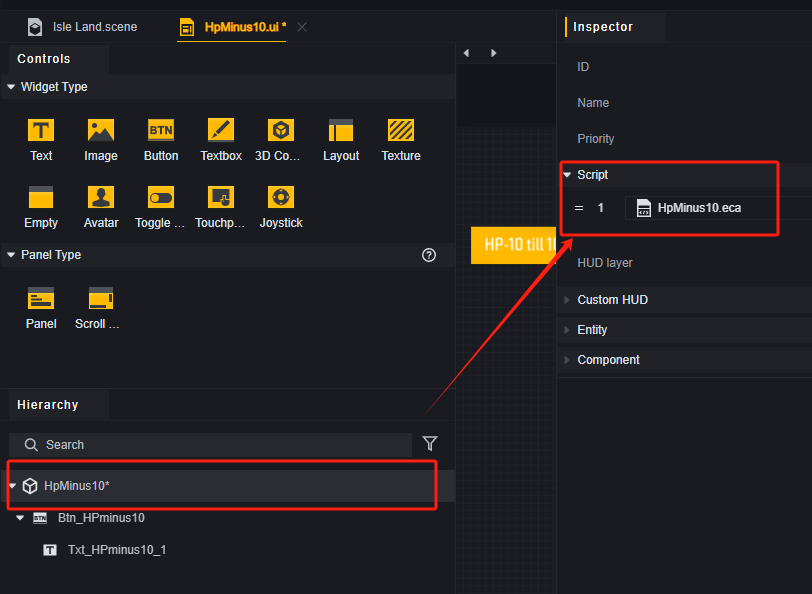
Write logic for the UI entity script.
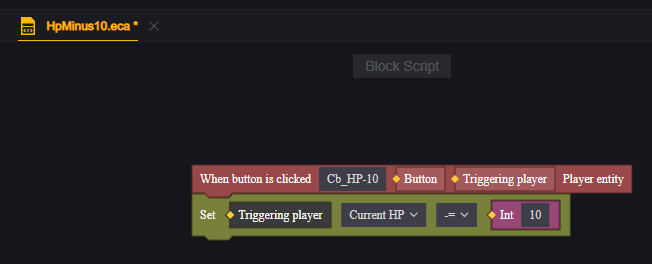
Here we create a button click callback function Cb_HP-10
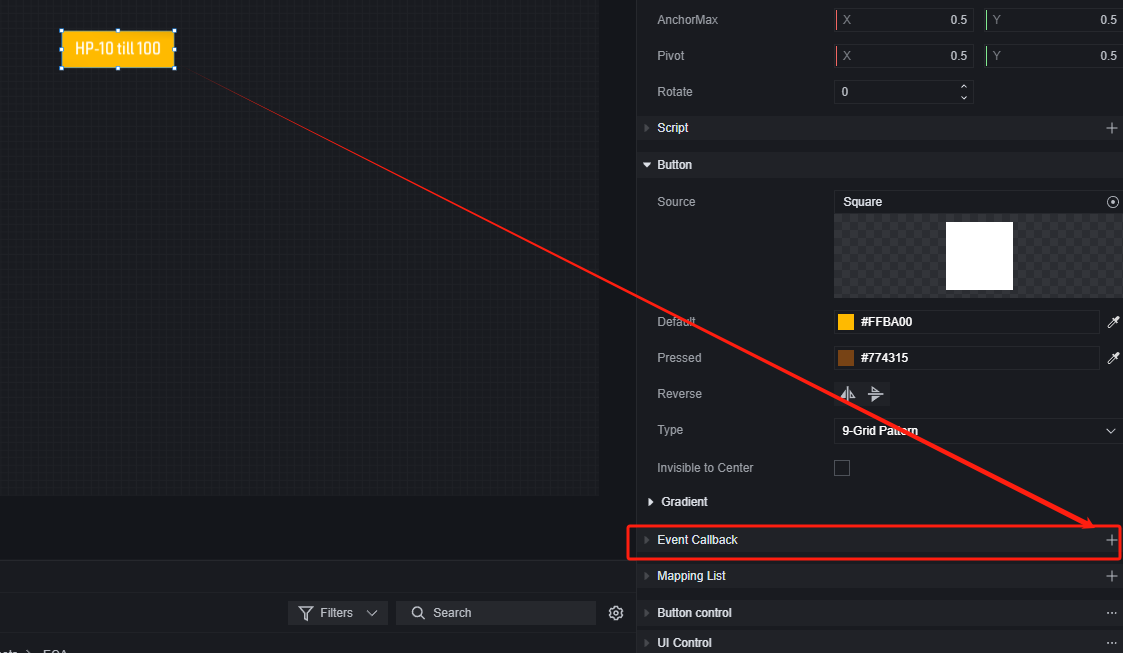
Return to the UI file editor, select the button widget and add a callback for it.

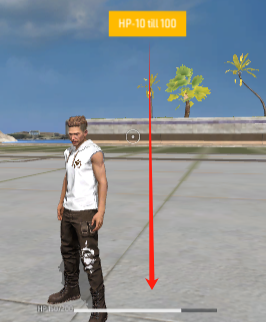
Go to the debug test:
Destroy button logic
In the global UI management script you need to make a function that destroys the UI, which is triggered by an external call handed to the button.

- Set the player as an input parameter.
- Confirm that the custom UI has been deleted by checking if that player has specific widgets.
- If not, delete the custom UI.
- Also clear the custom UI entities stored in the dictionary.
Return to the editor of the UI root node script, add the delete condition, and externally call the Delete Custom UI function when it is satisfied.
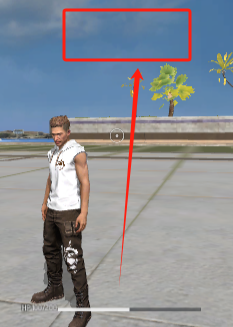
Go to debugging test:
Recommendations
For server UIs, high-frequency UI operations may result in high traffic consumption. If your UI becomes less responsive, you can try to limit the frequency of some information synchronization operations. For example, using a progress bar to display the player’s experience value may generate high traffic when the player gains experience frequently. It is recommended to separate the experience value data from the experience value UI representation and synchronize the data and representation every once in a while (this technique can also be used elsewhere).
Meanwhile, creating and destroying UI frequently will cause high performance overhead and traffic consumption. If you need to show and hide a UI intermittently, consider changing the properties related to UI display instead of preferring the implementation of repeatedly creating and destroying. This is more friendly to servers and low-performance devices.